前言
此文总结了Ardupilot飞控软件对源代码的一些介绍
Ardupilot代码框架介绍
Ardupilot代码主要由载具部分、共用库、其他开源库构成。
像ArduPlane、ArduCopter等文件夹中的是各种载具的代码。包含了像固定翼、多旋翼、循迹车等载具的方案。共用库保存在library文件夹中,其他开源库保存在modules里,如编译工具waf、轻量级操作系统ChibiOS等。
下面首先从载具代码开始介绍:
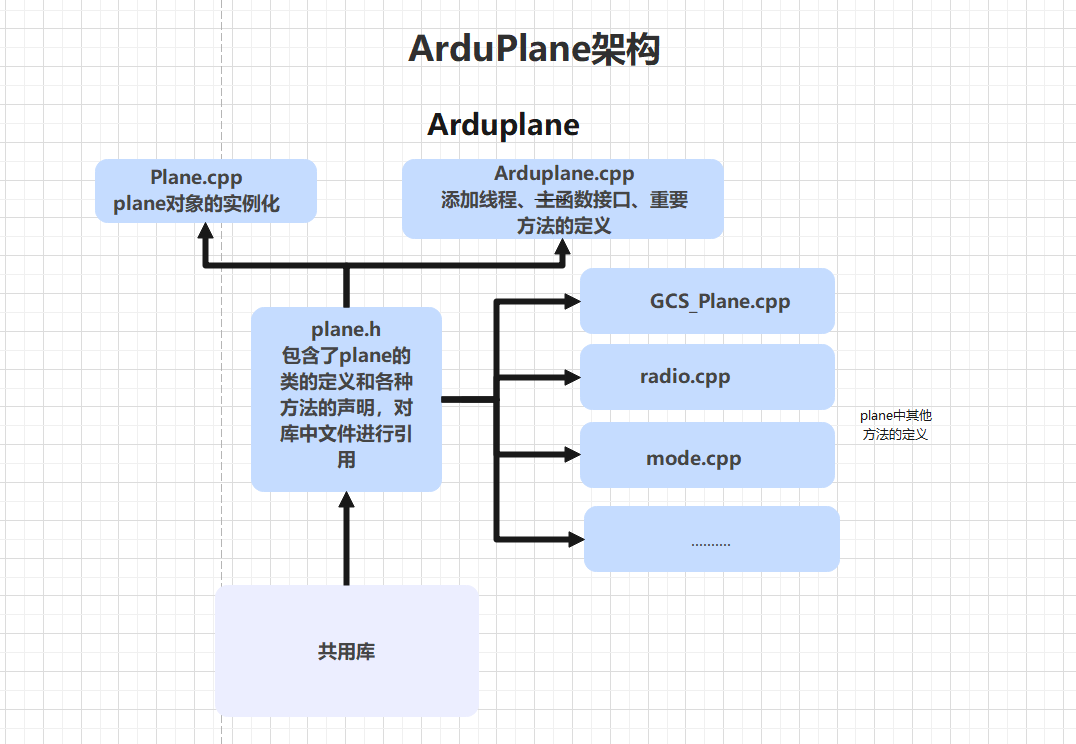
以Arduplane为例,在Arduplane文件夹下,文件构成为:
 其中,plane.h中将需要的库文件进行引用定义了一个plane类(在vehicle中进行继承),在Plane.cpp进行实例化,在ArduPlane.cpp中列举了线程和调用了主函数的接口,其他的cpp文件中将plane的方法进行了定义。
线程添加
在Arduplane.cpp中,添加线程是通过宏来完成的,在文件开头将宏进行了包装:
#define SCHED_TASK(func, rate_hz, max_time_micros, priority) SCHED_TASK_CLASS(Plane, &plane, func, rate_hz, max_time_micros, priority)
#define FAST_TASK(func) FAST_TASK_CLASS(Plane, &plane, func)
原始的线程的添加通过如下参数:
- 入口函数所在的类 classname
- 入口函数所在的对象的引用 classptr
- 入口函数 func
- 调用频率 _rate_hz
- 调用最长时间 _max_time_micros
- 优先级 _priority
这里宏的使用实际上是声明了一个结构体并为其赋值,并将该结构体的指针添加到指针数组const AP_Scheduler::Task *&tasks中去,这样方便管理线程的调度
电机控制
电机状态控制
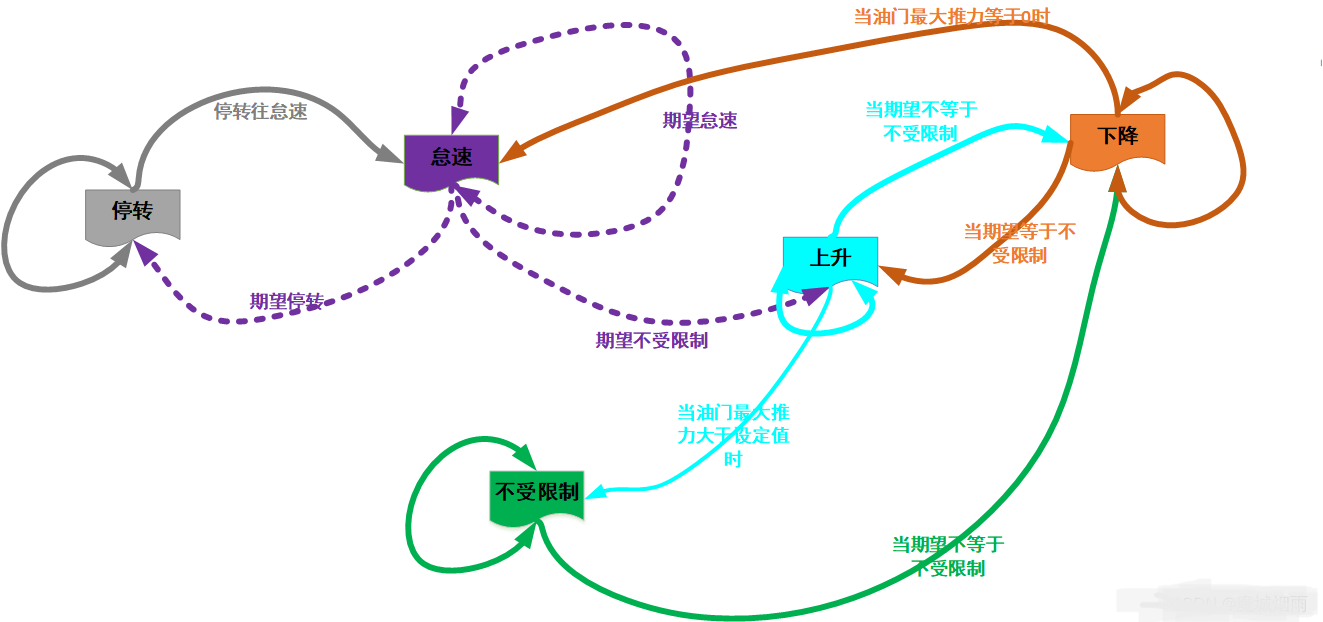
在ardupilot中,电机的运行状态有五种,分别是
- 停转(SpoolState::SHUT_DOWN):不转
- 怠速(SpoolState::GROUND_IDLE):电机以稳定状态的最小转速转动
- 下降(SpoolState::SPOOLING_DOWN):转速下降
- 上升(SpoolState::SPOOLING_UP):转速上升
- 全速运行(SpoolState::GROUND_IDLE):转速不受限制,以最大转速转动 各种状态的转换关系为:
 状态机函数:ModeStabilize::run();
期望状态只有三个:停转、怠速、全速运行
1.2由电机状态到PWM控制
修改占空比用到的代码:
void AP_MotorsMulticopter::output()
{
    //更新油门滤波------update throttle filter
    update_throttle_filter();

    //计算电池电压滤波和最大升力----- calc filtered battery voltage and lift_max
    update_lift_max_from_batt_voltage();

    //运行电机轴状态逻辑---- run spool logic
    output_logic();

    //计算推力----- calculate thrust
    output_armed_stabilizing();

    //对结构申请一个推力步长 apply any thrust compensation for the frame
    thrust_compensation();

    //转换rpy_thrust值到pwm---- convert rpy_thrust values to pwm
    output_to_motors();

    //输出所有的助推器油门值----- output any booster throttle
    output_boost_throttle();
};
输出到电机的函数:output_to_motors()
void AP_MotorsMatrix::output_to_motors()
{
    //变量定义
    int8_t i;
    //实际的需要的电机转轴状态
    switch (_spool_state)
    {
        //所有电机停转
        case SpoolState::SHUT_DOWN:
        {
            //不输出数据----- no output
            for (i = 0; i < AP_MOTORS_MAX_NUM_MOTORS; i++)  //最多12轴
            {
                if (motor_enabled[i])
                {
                    _actuator[i] = 0.0f;
                }
            }
            break;
        }
        case SpoolState::GROUND_IDLE:
            //当解锁时但是没有飞行发送到电机输出---- sends output to motors when armed but not flying
            for (i = 0; i < AP_MOTORS_MAX_NUM_MOTORS; i++)
            {
                if (motor_enabled[i])
                {
                    //设置怠速值
                    set_actuator_with_slew(_actuator[i], actuator_spin_up_to_ground_idle());
                }
            }
            break;
        case SpoolState::SPOOLING_UP:
        case SpoolState::THROTTLE_UNLIMITED:
        case SpoolState::SPOOLING_DOWN:
            //根据推力需求设置电机输出---- set motor output based on thrust requests
            for (i = 0; i < AP_MOTORS_MAX_NUM_MOTORS; i++)
            {
                if (motor_enabled[i])
                {
                    set_actuator_with_slew(_actuator[i], thrust_to_actuator(_thrust_rpyt_out[i]));
                }
            }
            break;
    }

    //将输出转换为PWM并发送到每个电机----- convert output to PWM and send to each motor
    for (i = 0; i < AP_MOTORS_MAX_NUM_MOTORS; i++)
    {
        if (motor_enabled[i])
        {
            hal.console->printf("i=%d\r\n",i);
            hal.console->printf("DD=%d\r\n",output_to_pwm(_actuator[i]));
            rc_write(i, output_to_pwm(_actuator[i]));
        }
    }
}
其中,rc_write(i, output_to_pwm(_actuator[i]));函数是写入PWM的的函数,actuator的值是实际的范围为0~1的动力值
// convert actuator output (0~1) range to pwm range
int16_t AP_MotorsMulticopter::output_to_pwm(float actuator)
{
    float pwm_output;
    if (_spool_state == SpoolState::SHUT_DOWN) {
        // in shutdown mode, use PWM 0 or minimum PWM
        if (_disarm_disable_pwm && !armed()) {
            pwm_output = 0;
        } else {
            pwm_output = get_pwm_output_min();
        }
    } else {
        // in all other spool modes, covert to desired PWM
        pwm_output = get_pwm_output_min() + (get_pwm_output_max() - get_pwm_output_min()) * actuator;
    }

    return pwm_output;
}
后面就是一层层调用函数,完成PWM值的传递
电机库的使用
电机库在/library/AP_Motors文件夹中,指定电机的输出位置是AP_Motors_Class.h文件开头,将电机编号与无符号整型绑定。下面是定义飞机的电机排布类型的枚举变量:
enum motor_frame_class {
        MOTOR_FRAME_UNDEFINED = 0,//未定义的电机框架类型,通常用于表示未知或默认状态。
        MOTOR_FRAME_QUAD = 1,//四旋翼飞行器,具有四个电机。
        MOTOR_FRAME_HEXA = 2,//六旋翼飞行器,具有六个电机。
        MOTOR_FRAME_OCTA = 3,//八旋翼飞行器,具有八个电机。
        MOTOR_FRAME_OCTAQUAD = 4,//八旋翼四旋翼混合飞行器,结合了八旋翼和四旋翼的特性。
        MOTOR_FRAME_Y6 = 5,//Y6飞行器,一种特殊的六旋翼设计。
        MOTOR_FRAME_HELI = 6,//直升机飞行器。
        MOTOR_FRAME_TRI = 7,//三旋翼飞行器,具有三个电机。
        MOTOR_FRAME_SINGLE = 8,//单引擎飞行器,一般指传统的单发动机飞机。
        MOTOR_FRAME_COAX = 9,//双层旋翼飞行器,例如双层直升机。
        MOTOR_FRAME_TAILSITTER = 10,// 尾翼垂直起降飞行器,能够在垂直和水平方向上运动。
        MOTOR_FRAME_HELI_DUAL = 11,//双旋翼直升机飞行器,有两个旋翼。
        MOTOR_FRAME_DODECAHEXA = 12,//十二旋翼六边形飞行器,具有十二个电机。
        MOTOR_FRAME_HELI_QUAD = 13,//四旋翼直升机飞行器,结合了四旋翼和直升机的特性。
        MOTOR_FRAME_DECA = 14,//十旋翼飞行器,具有十个电机。
        MOTOR_FRAME_SCRIPTING_MATRIX = 15,//脚本矩阵飞行器,通过脚本定义的多引擎飞行器配置。
        MOTOR_FRAME_6DOF_SCRIPTING = 16,//通过脚本定义的六自由度多引擎飞行器配置。
        MOTOR_FRAME_DYNAMIC_SCRIPTING_MATRIX = 17,//动态脚本矩阵飞行器,动态定义引擎的多引擎飞行器配置。
    };
电机的控制接口为
void AP_Motors::output_test_seq(uint8_t motor_seq, int16_t pwm)
PID控制的使用
在AC_PID库中提供了PID类的封装,在实例化的时候直接提供所需参数
AC_PID *pid = NEW_NOTHROW AC_PID(TEST_P, TEST_I, TEST_D, 0.0f, TEST_IMAX * 100.0f, 0.0f, 0.0f, TEST_FILTER);
在循环中可以直接获得控制量:
pid->update_error(error, TEST_DT);
const float control_P = pid->get_p();
const float control_I = pid->get_i();
const float control_D = pid->get_d();
gain = control_P+control_I+control_D
//或者直接gain = pid->update_error(error, TEST_DT);
其中,update_error可以使用update_all,update_跳过了滤波,直接输入了误差,而update_all需要输入目标是和测量值。两个函数的输入、输出量分别为:
float AC_PID::update_all(float target, float measurement, float dt, bool limit, float boost)
float AC_PID::update_error(float error, float dt, bool limit)
线程 AP_Scheduler的使用:通过task序列scheduler_task进行任务发布。scheduler_tasks是一个元素为SCHED_TASK的数组,SCHED——TASK的任务发布格式为SCHED_TASK(函数名, 调用频率,最长调用时间,优先级) ,
关于部分硬件层的调用
硬件层对象:hal
硬件层包含对象:
AP_HAL::UARTDriver* _serial0, // console
AP_HAL::UARTDriver* _serial1, // telem1
AP_HAL::UARTDriver* _serial2, // telem2
AP_HAL::UARTDriver* _serial3, // 1st GPS
AP_HAL::UARTDriver* _serial4, // 2nd GPS
AP_HAL::UARTDriver* _serial5, // extra1
AP_HAL::UARTDriver* _serial6, // extra2
AP_HAL::UARTDriver* _serial7, // extra3
AP_HAL::UARTDriver* _serial8, // extra4
AP_HAL::UARTDriver* _serial9, // extra5
AP_HAL::I2CDeviceManager* _i2c_mgr,
AP_HAL::SPIDeviceManager* _spi,
AP_HAL::WSPIDeviceManager* _wspi,
AP_HAL::AnalogIn*   _analogin,
AP_HAL::Storage*    _storage,
AP_HAL::UARTDriver* _console,
AP_HAL::GPIO*       _gpio,
AP_HAL::RCInput*    _rcin,
AP_HAL::RCOutput*   _rcout,
AP_HAL::Scheduler*  _scheduler,
AP_HAL::Util*       _util,
AP_HAL::OpticalFlow*_opticalflow,
AP_HAL::Flash*      _flash,
#if AP_SIM_ENABLED && CONFIG_HAL_BOARD != HAL_BOARD_SITL
    class AP_HAL::SIMState*   _simstate,
#endif
#if HAL_WITH_DSP
        AP_HAL::DSP*        _dsp,
#endif
#if HAL_NUM_CAN_IFACES > 0
        AP_HAL::CANIface* _can_ifaces[HAL_NUM_CAN_IFACES])
#else
        AP_HAL::CANIface** _can_ifaces)
#endif
scheduler是指调度器,负责管理线程中时间上的协调。常用法为:
hal.scheduler->delay(int time);
console是终端控制台,可以进行打印、读取等操作,常用法为:
hal.console->printf("Hello world\n");
hal.console->read();
rcout是PWM输出,首先进行初始化、解除安全锁、通道使能,再输出信号:
hal.rcout->init();
hal.rcout->enable_ch(1);       // 通道1使能
hal.rcout->force_safety_off(); // 强制开启安全锁
hal.rcout->write(1,1500);      // 写入PWM信号
hal.scheduler->delay(1000);
Gitalking ...